
Install
Follow this guide to physically install and connect the CineSend CSX Broadband Digital Cinema Receiver:
1. Before Your Start
To complete the installation, you will need:
- Phillips screwdriver
- Ethernet cables
- A router with an internet connection
- A free power plug
2. Carton Contents
Each CSX carton contains the following parts. The power cable, rack tabs, and screws are in an accessory bag taped to the top foam block. If your carton is missing one or more components, contact our installer support line.
- 1x CSX Device with Removable Front Bezel

- 1x Power Cable

- 2x Rear Rack Ears

- 8x Rack Tab Screws

- 4x M6 Rack Screws

- 4x M6 Cage Nuts

- 4x 10-32 Rack Screws


3. Racking the CSX
We recommend you plan to install your CSX in an equipment rack or projector pedestal that has easy access to an internet connection and the cinema's media LAN (or directly into the playback server for single-screen locations). The CSX can be safely installed using just the front rack ears on 2-post tracks. We have also included rear rack ears for installations in 4-post racks.
Step 1:
- Identify if you have a threaded-hole or square-hole equipment rack:
 If your rack has threaded holes (right), you'll need to identify the correct screw size out of the two sizes included. If your rack has square holes (left), you will need to first install the included cage nuts like so:
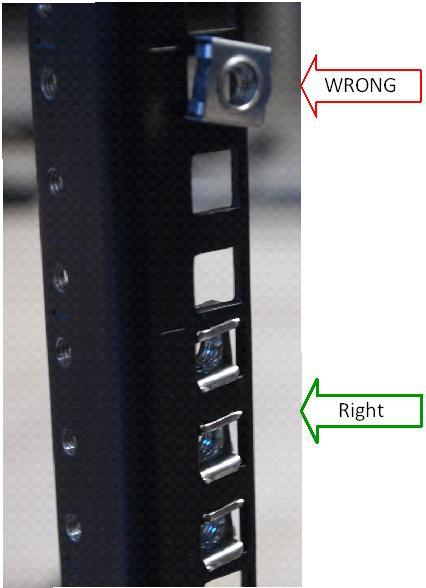
- With the assistance of a second person, insert the CSX in a free rack space and tightly fasten all four rack screws:

- Ensure no other heavy equipment is resting on top of the CSX
 If your rack has threaded holes (right), you'll need to identify the correct screw size out of the two sizes included. If your rack has square holes (left), you will need to first install the included cage nuts like so:
Step 2: (optional, only for 4-post racks):
- Attach the reach rack ears to the back two rack posts at the correct height for the CSX to be horizontally level
- Using the included rack ear screws, attach the ears to the CSX through the adjustable mounting holes:


4. Connecting Cables
The CSX has 6 ports on the rear that should be connected as follows:

- Power: Connect to a surge-protected power bar or UPS
- Service: Do not connect anything to this port
- Eth 1: Connect to the internet either through a switch in your booth or directly into the router provided by your internet provider
- Eth 2: Connect either directly into a free ethernet port on your playback server or to a switch if your location has a media network or TMS
- Eth 3: Do not connect anything to this port
- CSL: Do not connect anything to this port
Additionally, the CSX is equipped with two front-accessible USB3 ports that can be used to offload content from the CSX to removable drives. You do not need to connect anything to these ports during installation or setup.
5. Powering On
The CSX should automatically power on once the power cable is attached. If the unit does not power on, you can access the power switch by removing the front bezel. To do so, slide the locking latch left while pulling the bezel forward. When re-attaching the bezel, you will need to slide the locking latch left again and release it once the bezel is in position. The bezel does not snap into place with pressure.
 To power the unit on, press and release the power button here:
